ID: ZTN 1787
This Zetafax technical note applies to:
- Zetafax 2010 and later
- Microsoft Exchange Server 2010 RTM version
Summary
This technical note documents the manual steps required for the configuration of the Exchange Server and Active Directory to allow Zetafax Server v2010 to function with Exchange Server 2010. These steps are for server administrators who wish to have total manual control over their Exchange 2010 Server machine and do not wish to run the Zetafax Exchange Server 2010 installer.
Prerequisites
An Exchange 2010 environment should already be set up and functional.
Microsoft Exchange Server MAPI Client and Collaboration Data Objects 1.2.1 should be installed on the machine that will host Zetafax Server v2010.
Installation Information
Access to an Exchange Hub Transport Server is required for the installation steps to enable delivery of faxes between Zetafax and Exchange.
Folder actions
· Create an intermediate drop directory for fax messages to be sent to (e.g. C:\Program Files\Zetafax Exchange 2010\drop\) and share the folder.
· In the drop directory, create a folder named badmail to store any potentially corrupt messages.
· Share out the pickup directory in TransportRoles\Pickup in the Exchange 2010 install directory of the Mailbox Server (e.g. C:\Program Files\Microsoft\Exchange\v15\TransportRoles\Pickup).
NOTE ON SHARING: sharing requires authenticated users (i.e. the Zetafax Server machine) to have read and write permissions enabled, otherwise, fax messages will get stuck in the queue.
Setting up an Active Directory Connector Object:
· Run the Exchange Management Shell.
· Run the following commands:
o New-foreignconnector –Name “Zetafax Exchange Connector ” –AddressSpaces “fax:*”
§ is the machine name of the Mailbox Server you are using e.g. 2010server.
e.g. New-foreignconnector –Name “Zetafax Exchange Connector 2010server” –AddressSpaces “fax:*”
o Set-foreignconnector –Identity “Zetafax Exchange Connector ” –DropDirectory “” –DropDirectoryQuota 100MB
§ is the machine name of the Mailbox Server you are using e.g. 2010server
§ is the network path to the shared drop directory created in a previous step e.g. \\2010server\drop
e.g. Set-foreignconnector –Identity “Zetafax Exchange Connector 2010server” –DropDirectory “\\2010server\drop” –DropDirectoryQuota 100MB
Setting Up Cached Mode Compatibility
To enable the fax connector for Outlook clients running in cached mode, a fax recipient must be set up from the Exchange Server.
· Run the Exchange Management Shell.
· Run the following commands:
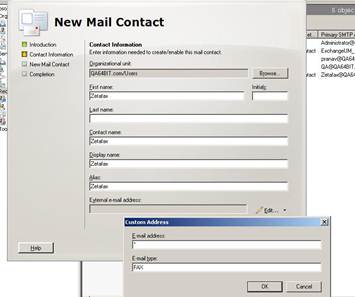
o New-MailContact –ExternalEmailAddress:’FAX:*’ –Name:’Zetafax’ –Alias:’Zetafax’ –OrganizationalUnit:’’ -DisplayName:’Zetafax’ –FirstName:’Zetafax’
§ is the organizational unit that was specified during set up of the Exchange server.
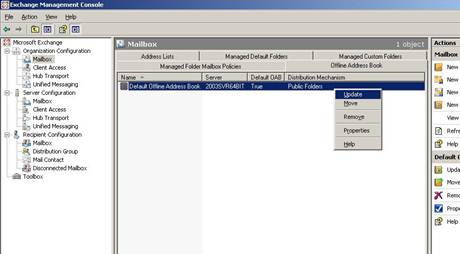
· The Offline Address Books need to be updated to reflect the additional Zetafax recipient. This should be done with the following steps in Exchange Management Shell:
o Call Get-OfflineAddressBook to retrieve a list of address books available to the server.
o Call Update-OfflineAddressBook –Identity “
” for each offline address book listed on the previous step, where is the name of the offline address book.
NOTE: If faxes return with a Non-Delivery Report, restart the Microsoft Exchange Information Store service on the Exchange server.
Additional Setup Options
For administrators wishing to use the functionality found in the Zetafax tab within Active Directory Users and Computers, please run the schema update utility (ZFSchemaUtil.exe) beforehand (found in the product download in \Zetafax\Exchange Server 2010\ZFSchemaUtil.exe or installed in \Zetafax\ex10cnctr\Program Files 64\Zetafax Exchange 2010\ZFSchemaUtil.exe), using a Schema Admins account.
The Zetafax tab is enabled by registering the files ZfuSnapIn2K10.dll and ZfcAd.dll found in the product download in \Zetafax\ Exchange Server 2010\ or installed in Zetafax\ex10cnctr\Program Files 64\Zetafax Exchange 2010\.
Copy the 2 files to C:\Program Files\Zetafax Exchange 2010\.
Use these commands in Start > Run to register the DLL files:
· regasm \ZfuSnapIn2K10.dll
o From the command line, go to the folder: C:\Windows\Microsoft.NET\Framework64\v2.0.50727
o Run the following command: regasm \ZfuSnapIn2K10.dll
· regsvr32 \ZfcAd.dll
NOTE: schema changes are irreversible once performed. Please ensure that you are happy with these schema changes being applied to your Active Directory setup.
References
ZTN1784 – HOWTO Updating to Zetafax 2010
Last updated: 12th August 2015 (AL)
Keywords: Exchange 2010 manual install