HOWTO: Install and configure the email gateway for Exchange 5.5, Exchange 2000, and Exchange 2003
Print
ZTN1238
ZTN1238
This Zetafax technical note applies to:
- Zetafax 6.00 with Exchange 5.5
- Zetafax 7.5 with Exchange 2000
- Zetafax 8.0 and later with Exchange 2003
Summary
The Zetafax Email Gateway acts as a link between an email system and the
Zetafax server. It allows faxes to be submitted directly from the email
client program, and will deliver received faxes to the users email Inbox.
Requirements
There are a number of requirements needed to be met before the email gateway
can be installed.
- Zetafax server needs to be installed and configured.
- The Zetafax Server application must not be running during the installation
of the email gateway.
- The exchange connector needs to be installed on an Exchange 5.5 or
Exchange 2000 machine.
- Outlook 2002, 2000, or 98 (for Exchange 5.5 only) needs to be installed
with a user profile on the machine where the Zetafax server is located. This
is to ensure that a list of email users can be imported from Microsoft
Exchange.
(Note: You must not install Outlook on the same system as
exchange as specified by Microsoft.).
- Applications that you wish to render, i.e. Word and Excel should be
installed on the Zetafax server system.
- The installation must not be done on a machine running terminal services.
Installing the email gateway
As of Zetafax Server version 9 the Email Gateway is automatically installed
when the Zetafax server installation is done, and is not required to be
installed separately.
1. To install the gateway insert the
Zetafax CD, navigate to the email gateway section and click on 'Install
Zetafax E-mail Gateway'.
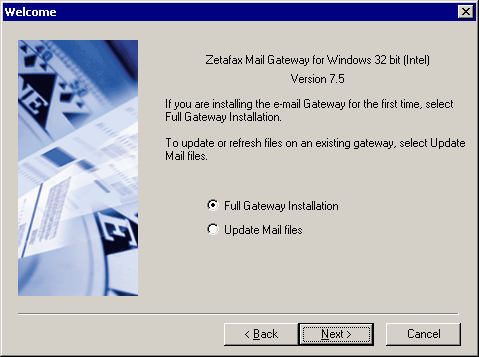
2. You will be presented with a
Welcome screen (see below), Select Full Gateway Installation.
Then click next.
- After the program files have been installed the next section will require
you to add a mail system, configure it and enable rendering.
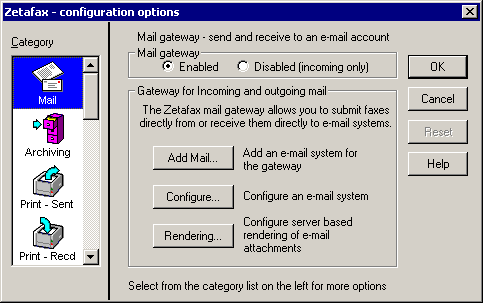
- Click on the Add Mail. option, select the mail system
that you are using.
NOTE: With version 7.5.1.91 or later you will have the
option for Microsoft Exchange not 5.5 or 2000. You will only
need to select Microsoft exchange.
- The next step is to configure the email system you have chosen (see
below). Ensure that the driver enabled option is ticked and you have correctly
specified the connector path location. All the other setting should be left as
default.
(NOTE: you will have to share the folder if the Exchange and
Zetafax are installed on separate systems).
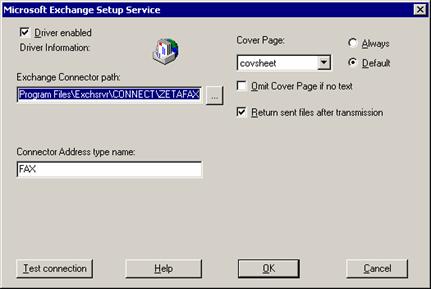
- Click the Test Connection button to ensure the
Exchange Connector path is correct. If there are any problems
with connections please ensure the path name is valid. If using an UNC path
please ensure you have the right permissions to the share.
- After you receiving a Connection OK message, click
OK and OK again to continue onto the next
section.
Now the rendering options for the email gateway need to be configured. This
section takes you through the stages of
· Registering
rendering applications,
· Installing the Mail
Rendering Subsystem printer driver on the Zetafax server PC.
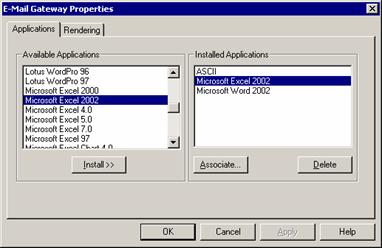
1. To configure rendering select the
rendering option button (see below).
2. You will need to install ASCII
(see below) and associate RTF files with word to do this first Install word so
that is appears in the Installed Applications list just click
on Associate and type in RTF in the customize section.
3. Once you have finished installing
your applications, click on the Rendering tab. Once the
rendering options have been made available to you. The mail rendering subsystem
printer has been installed. You will now be able to see the Mail
Rendering Subsystem printer in the printer's folder (this will be in
addition to the Zetafax FaxMerge Printer and Zetafax Printer).
4. After you have added all the
required applications click OK, and OK again
to exit.
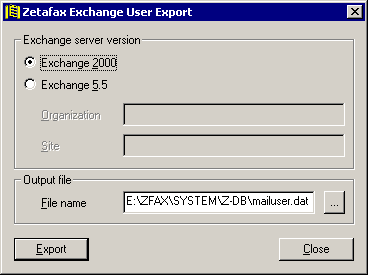
5. The next stage is to configure
Zetafax users to use the email gateway. You will be prompted to enable users and
to do this Zetafax needs to export a list of user's email addresses from the
Exchange server.(see below)
6. If you are using Exchange 5.5
please ensure that you have correctly typed in your organisational name and site
name. If the names are not correct then the import of addresses will fail. You
can get the exact name in Microsoft Exchange Administrator.
7. After the import has taken place
you can choose to setup a mail user profile so one email users can submit faxes
via a shared account. On this occasion please select NO and
NO again as you can enable current Zetafax users to use the
email gateway.
8. You will now need to enable the
Zetafax users to use the email gateway. This can be done by selecting a Zetafax
user in User and User groups and click on options on the screen below. To import
his email user name click on Browse select his name from the
list.

9. After enabling users they should
be able to use the email gateway once the Zetafax outlook extensions have been
installed.
NOTE: for more information on installing the Outlook forms
and extension please refer to the technical note ZTN1113 HOWTO: Installing
Zetafax Outlook forms and extensions
References
ZTN1113 HOWTO:
Installing Zetafax Outlook forms and extensions
Last Updated: 14 December 2005 (MS/EB)
First Published: 27 Nov 2002 (IM/SV)