HOWTO: Install Zetadocs for NAV v3.0 client in a Terminal Services / Citrix environment
Print
ZTN4060
HOWTO: Install Zetadocs for NAV v3.0 client in a Terminal Services / Citrix environment
ID: ZTN 4060
This Zetafax technical note applies to:
- Zetadocs for NAV version 3.0 and later
Supported Operating Systems:
- Windows 2003 Standard Edition with Terminal Services
- Windows 2003 Server with Citrix Presentation Server 4.5
- Windows 2008 Standard Edition with Terminal Services
Summary
This how-to guide will ensure that the Zetadocs NAV client is correctly installed in a Terminal Services/Citrix environment. In summary, the steps include:
- Checking that your scenario is supported.
- Ensuring you are logged in as an Administrator.
- Ensuring the Terminal Server is set to Application Server/Terminal Server mode.
- Ensuring the permissions are granted to install kernel-mode printer drivers.
- Installing the Zetadocs NAV client (directly on the terminal server and not from within an RDP session).
- Setup printer settings modifier for each session.
- Terminal Services and Citrix Published Desktop: Create a printer settings modification shortcut in All Users-> Start Up
- Citrix – Published application: Configuring published application to launch using the printer settings modifier.
- Testing the Zetadocs NAV client.
On some systems due to default Windows security settings, Zetadocs PDF printer drivers are not automatically installed. The following information will allow you to manually configure these drivers.
More information
Step 1: Check that your scenario is supported
Remote Session mode: Supported
An application (e.g. NAV) and Zetadocs are installed onto the terminal server. A single remote session is opened onto the server. The user opens an application (e.g. NAV) in the remote session, and prints to the Zetadocs PDF printer. Zetadocs client will launch automatically within the remote session. Zetadocs is able to start Microsoft Outlook in the remote session.
Published Application mode: Supported
An application (e.g. NAV) and Zetadocs client are installed onto the terminal server. An application (e.g. NAV) runs as a published application and prints to the Zetadocs PDF printer. In this scenario Zetadocs client starts up in the same window as the published application. When both applications terminate, the published application window closes down automatically.
Remote mode: Not supported
An application (e.g. NAV) is installed on a client machine and Zetadocs is installed on the terminal server. An application (e.g. NAV) is opened on the client but not within a remote session. The client application is still able to see the shared Zetadocs PDF printer on the remote server. However, the application cannot print to the printer in this case.
Mixed mode: Not supported
An application (e.g. NAV) is installed on the terminal server and the Zetadocs client is installed on a client machine. In this mode, NAV runs as a published application (in a remote session) and prints to the Zetadocs PDF printer. The user starts up the Zetadocs client on the client machine (not in a remote session). In this scenario the client is unable to pick up the printed files from the server and so this scenario is not supported.
Step 2: Ensure you are logged in as an Administrator
Log on to the terminal server system as a user with administrative rights.
Step 3: Ensure that the Terminal Server is set to Application Server/Terminal Server mode
Before installation, the terminal server must be switched into Terminal Server mode (Windows 2003).
See http://support.microsoft.com/default.aspx?scid=kb;en-us;306626& sd=tech
Step 4: Ensure permissions are granted to install kernel-mode printer drivers.
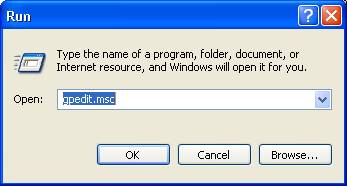
- From the Start menu select run.
- In the run dialog type gpedit.msc and press OK.
- Browse to the Disallow installation of printers using kernel-mode drivers option in Computer configuration|Adminstrative Templates|Printers:
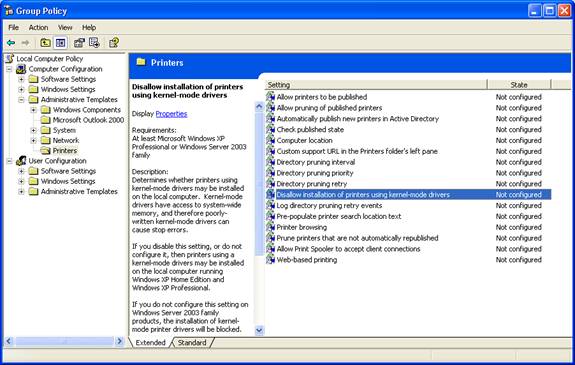
- Use the right click menu to open the Properties dialog.
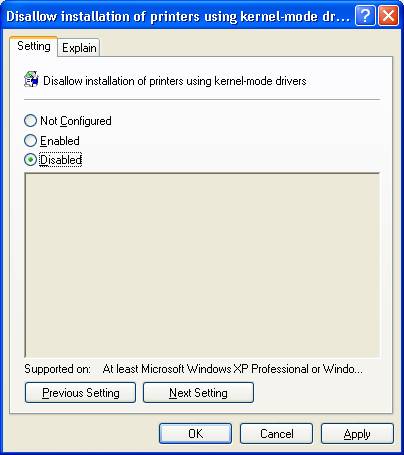
- Set this option to Disabled and select OK.
Step 5: Install Zetadocs NAV Client on the Terminal Server
Note: Installing the Zetadocs Client application and printers should be done by logging onto the terminal server system and not via a terminal session.
- Log onto the Terminal Server machine locally as an Administrator.
- Bring up a command prompt.
- Type the following:
change user /install
- This puts the Terminal Server into install mode.
- Still at the command prompt, change to the folder “Zetadocs for NAV Client” (“Zetadocs for NAV Client x64” if on 64-bit OS). Type the following:
Setup.exe
- This runs the Zetadocs for NAV Client Applications installer for all users.
- Run through the installer UI as you would normally.
- When the installer is complete, type the following at the command line:
change user /execute
Note: If the installation of Zetadocs client has failed for some reason, please refer to the following Microsoft TechNet article:
http://www.microsoft.com/technet/prodtechnol/windowsserver2003/library/ServerHelp/447dad75-28f5-4e99-80f8-17ad2359ba66.mspx
Step 6: Setup printer session settings modifier
Depending on your system configuration choose between A or B below.
A: Terminal Services or Citrix Published Desktop: Create printer settings modifier short-cut.
- Browse to the Zetadocs for NAV Client install folder. By default this is “C:\Program Files\Zetadocs NAV”
- Right-click PrinterSettingsModifier and select “Create Short-cut”.
- Right click the new short-cut and select properties.
- In the “Target” field add the path to the ZdNAVSetting.xml file in the install folder. By default this is “C:\Program Files\Zetadocs NAV\ZdNAVSettings.xml”. Your resulting target value should look like this:
“C:\Program Files\Zetadocs NAV\PrinterSettingsModifier.exe” “C:\Program Files\Zetadocs NAV\ZdNAVSettings.xml”
- Click OK and select the “PrinterSettingsModifier” shortcut.
- Use Ctrl+C to copy to the clip board.
- Browse to the All Users, Start-up folder. By default this is “C:\Documents and Settings\All Users\Start Menu\Programs\Startup” on 2003 and “C:\Users\Default\AppData\Roaming\Microsoft\Windows\Start Menu\Programs\Startup” on 2008, create it if it does not exist.
- Use Ctrl+V to paste the shortcut.
This will cause the Zetadocs Automation Subsystem printer settings to be modified for each session to the correct values to work with Zetadocs for NAV for the current user.
B: Citrix - Published Application: Publish Microsoft NAV for use with Zetadocs Client.
- On the Citrix server, run Citrix Access Management Console from Start | All Programs | Citrix | Management Consoles.
- Expand Citrix Resources | Presentation Server | < Citrix farm>
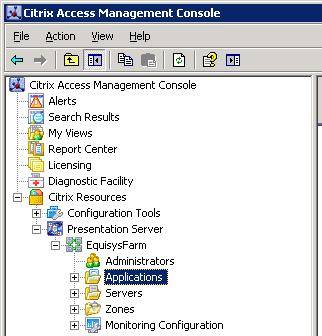
- Right click on Applications and select New | Publish Application.
- Give the published application a name and description. Click Next.
- Choose Application and Access from server. Click Next.
- You will now need to set the application path as follows:
< Zetadocs NAV> \PrintSettingsModifier.exe < Zetadocs NAV> \ ZdNAVSettings.xml < NAV> \fin.exe
Where:
< Zetadocs NAV> is the install folder for the Zetadocs for NAV Client. The default path is “C:\Program Files\Zetadocs NAV”
< NAV> is the install folder for the NAV C/SIDE client. The default path is “C:\Program Files\Microsoft Dynamics NAV\CSIDE Client\fin.exe (or finsql.exe depending on whether you are running the SQL version).
E.G. “C:\Program Files\Zetadocs NAV\PrinterSettingsModifier.exe” “C:\Program Files\Zetadocs NAV\ZdNAVSettings.xml” “C:\Program Files\Microsoft Dynamics NAV\CSIDE Client\fin.exe”
Click Next.
- Choose a Citrix server which will publish the application. Click Next.
- Enable the users and/or groups who can access the published application. Click Next.
- Continue with the wizard enabling any features you wish to use. Click on Finish at the end.
Test the Zetadocs for NAV Client from a Published Application.
- Run Program Neighbourhood from Start | Programs | Citrix | Citrix Access Clients | Program Neighbourhood.
- Open Microsoft NAV. Create a sample document by printing from a report which has been modified for Zetadocs for NAV.
- Print your sample document to the Zetadocs Automation Subsystem printer.
- Once the document has been successfully printed Zetadocs client will be started and the printed document will appear in the document explorer window.
- Send the document via email, hard copy or fax.
References
Last updated: 14 October 2009 (BM/MW)