Creating Rules
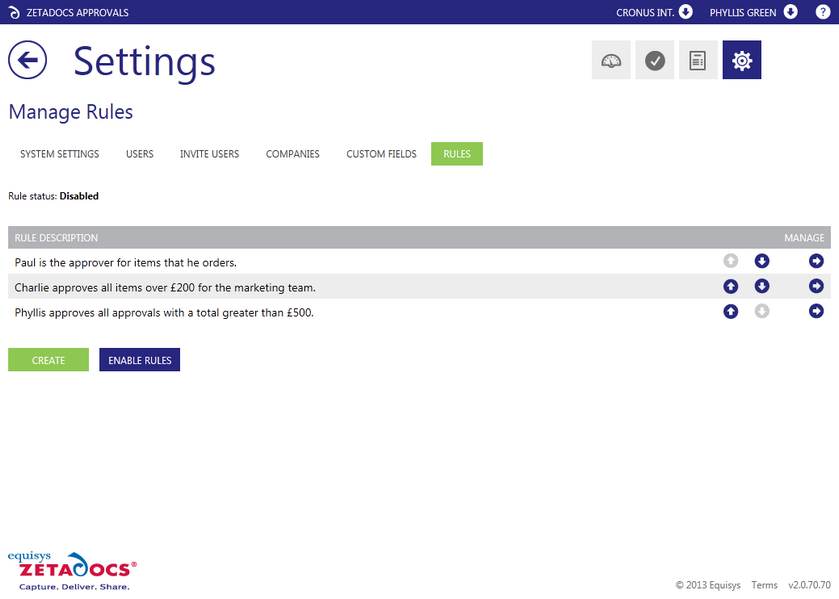
The Rules page displays a list of all rules which have been set up. From here you can manage the details of the existing rules or create new ones for your account. The rules are applied in descending order with Zetadocs finding each approver who matches the approval requests details, building up a list of approvers.

Documenting your Existing Systems
We recommend that you make a list of your existing business logic so that you are in a position to replicate this in a series of Zetadocs Approval rules. Start by identifying how you currently decide who approves a document and choose the corresponding field from your accounting software. Zetadocs uses the information stored in your accounting software to make decisions on who needs to approve a document. Common examples are Department Code, Purchaser Code, Vendor Name and Project Code but this can be done on any custom text field you have as well.
Rule Basics
Zetadocs Approvals uses a series of If statements to build up a rule, they follow a simple structure using AND to tie statements together to build complexity. If you are having trouble understanding a rule try reading it as a sentence.
For example:
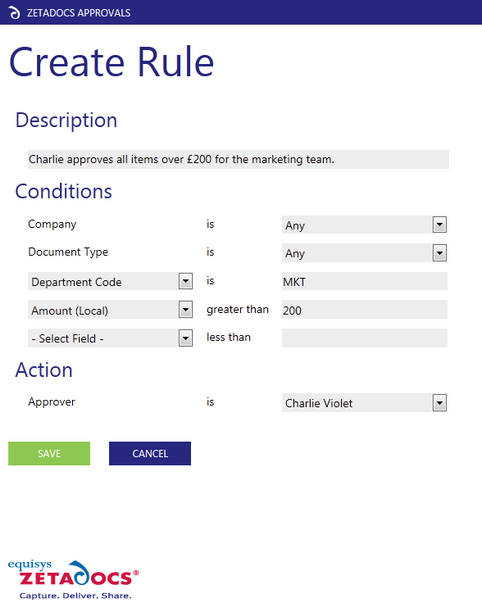
Rule Description: Charlie approves all items over £200 for the marketing team.
Company = Anyl
Document Type = Any
If Department Code = MKT
If Amount > £200
If Amount ≤ left blank
Action
Approver = Charlie Violet
This reads as "For all companies and document types if the document is for the Marketing department AND the Amount is over £200 then the Approver is Charlie."
Creating Rules in Order
Rules can be moved up and down the list to change their order, each rule you create will appear at the bottom of the list, meaning it will be processed last and any approver who matches the criteria will be the last approver. As such we recommend you create the rules at the bottom of your organization's hierarchy first and work your way up, otherwise if you have the finance directors rule at the top of the list, the rule would then add them in at the start of the approval process. At this stage the finance director would not know if the goods were received or if the budget holder is happy with the purchase, as they have not yet processed the approval.
Each approver will only be asked to approve a document once so don't worry about having similar rules with a similar output e.g. a rule for a manager to cover their department and one to cover individual members of staff in that department. Even though an approval request can satisfy both of these rules the approver would only be selected once. This lets you match the complexity of your organizations needs by creating as many rules as necessary.
Changing the Rule Order
To change the order of the rules simply view the rules list and find the rule you wish to move, there are three arrows at the end of the line containing the rule. The up and down arrows will move the rule up or down a line whilst the arrow facing right allows you to view the Manage Rule page and adjust any aspect of the rule you require.
Creating a Rule
Now we've covered the basics lets looks at creating a simple rule.
1.Select the Create button at the bottom of the Rules table to display the Create Rule Page.
2.Enter a description of the purpose of the rule into the Rule Description field. Remember this will be used to identify the rule in the Rules table so the clearer you are the easier it will be to locate and edit rules in future.
3.Now you have to determine which company the rule is to apply to, many companies have separate accounts for different business regions or divisions, by default the drop down menu is set to all but does contain each configured company in the system.
4.You can now determine what types of document the rule applies to, again by default the drop down menu is set to all but does contain each configured document type in the system.
5.Next choose the Select Field drop down menu of the first line and choose the value you are using, the available options are:
Standard Fields:
Purchaser Code
Currency Code
Vendor Name
Document Number
Vendor Number
Custom Fields, by default the two options below are configured but any configured text field can be used:
Department Code
Project Code
6.If you were trying to ensure that an approver receives all approvals requests, for items they have purchased you would use Purchaser Code. Conversely if you were trying to provide a manager with oversight of his department's transactions you could use Department Code.
7.Next add the value you are trying to match against this field, this must match the value in your accounting software.
8.So far we have identified a piece of information we wish to use to provide a match to a specific approver, you now have the option to add another condition based upon the Amount of the items being approved. This enables you to specify a limit above or below which the approver will be selected. For example a manager may only be interested in approving purchases above £200 in his department.
9.Enter this if required, if left blank the lines will be ignored and the user will approve all items which match the first IF statement.
10.Now having established the criteria upon which to assign an approval we can now select the approver we wish to use when these conditions are met, from the drop down menu select the desired approver.
11.Click Save to add the rule to the bottom of the rule table.
12. On returning to the Rule table you should see your new rule at the bottom, use the Up and Down arrows on the row to move it into the correct position relative to your other rules.
13. Once you have configured your rule or rules locate the Enable Rules button this will result in rules being used to work out the recommended approvers for each approval that you start from then on.
It is easier to understand the rule process by looking at an example, so we have worked up our example with Charlie, Paul and Phyllis in the Worked Example topic.
