![]()
How do I create a coversheet?
Personalized coversheets can help your business identity. Allowing you to increase awareness of your corporate branding without incurring any extra costs.
Note: Coversheet creation can only be done by users that have Administrator status.
Coversheet Creation is done in two stages. This allows you to add both background data such as images, lines and words that you do not intend to change on a fax to fax basis and also foreground data such as fax addresses, names and dates that will differ for each fax.
Create the coversheet background file
•Open Word.
•Add your corporate logos, and design the layout for the background of your coversheet.
•Print your document to the Zetafax Printer.
The Zetafax Client will open and the Fax Wizard - Welcome dialog box will be displayed.
•Select the Save as an attachment or other system file option.
•Click Next.
The Save As dialogue will be displayed:
•Choose the Coversheet, letterhead or attachment file option.
•Select the Coversheet background - optional checkbox.
•Provide a name for your Coversheet within the File name text box.
•Add a description in the Description text box.
•Select the OK button to save the background of your coversheet.
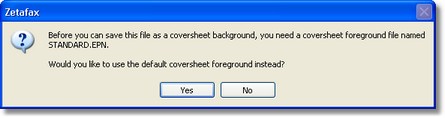
•Select Yes to add variable fields to your fax form.
Create the coversheet foreground file
•On the Tools tab, click Coversheet Editor.
•Open the coversheet you wish to modify, or select New to create a blank coversheet or use one of the standard coversheet templates.
Add a text field
Adding a text field allows you to add information to your coversheet that is going to remain the same between faxes.
•Click on the Insert Text button:
•Choose where on you fax you would like this information to appear, and click the left button on your mouse.
•Type the text you want to add.
Add a merge field
Adding a merge field to your coversheet allows you to add fields that will personalize your coversheet.
•Click on the Insert Field button:
The Field menu will be displayed:
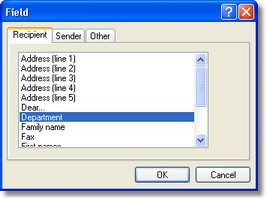
•Select the field you would like to add to the coversheet.
•Choose where on you fax you would like this information to appear, and click the left button on your mouse.
Your field is now added to your coversheet.
Insert a line
One or more lines can be added to your coversheet to separate sections.
•Click on the Insert Line button:
•Draw your line by holding down the left button on your mouse and moving the mouse till you get a line of the desired size.
Your line is now added to your coversheet.
Insert a box
Boxes can be added to your coversheet to allow information such as any notes you may wish to be add to be separated from the rest of the information on the coversheet.
•Click on the Insert Box button:
•Draw your box by holding down the left button on your mouse and moving the mouse till you get a box of the desired size.
Your box is now added to your coversheet.
Editing your coversheet
Having added fields to your coversheet, these can be edited using the Coversheet Editor at anytime.
Having loaded the coversheet you wish to edit into the Coversheet Editor you can:
Edit text
Any text fields added to your coversheet can be changed by selecting them with you left mouse button. This will move your cursor to the field and allow you to add, delete or change text as required.
Format text
By clicking the right button of your mouse over any text or fax field, you will be given options to edit the formatting of that text. You can:
•Change the font.
•Edit the text or change the fax field.
•Justify the text or fax field.
•Delete the item.
If you choose to change the font, the following menu will be displayed:

This allows you to change the appearance of your selected text.
Move fields
All fields can be moved by selecting them with you left mouse button and either dragging them or using the arrow keys on your keyboard.
Change line thickness
For both lines and boxes that have been added you can change the thickness of lines by clicking the right button of your mouse on the object and selecting the Properties option. This will provide you with a Properties menu for that item, allowing you to change the line thickness. In addition, you can add a shadow to any boxes you might have added.
Saving your Coversheet
Having created a coversheet you are happy with, simply select the Save As option from the File menu and provide a name and description of your coversheet. You can now use your coversheet the next time that you send a fax.