![]()
Configuring Zetafax to connect to Exchange Online
To enable Zetafax to communicate with Exchange Online you need to configure the Email Gateway using the Zetafax Configuration program.
Step 1: Enable the email gateway
•Open the Zetafax Configuration program, choose the Server settings option from the left pane, then click the Email Gateway icon to display the email gateway configuration settings dialog.
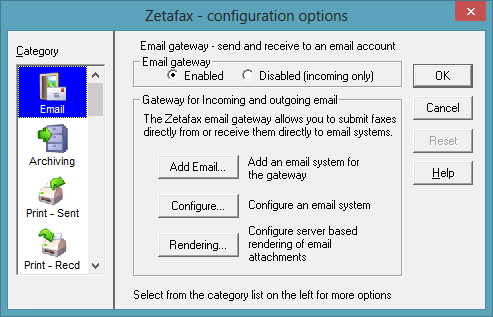
•The default setting is for the Email Gateway to be disabled.
•Select the Enabled radio button to enable the Email Gateway.
Please note: Whenever you switch between Enabled and Disabled, all email addresses held by Zetafax are removed. These addresses can take some time to set up again, so take care not to disable the Email Gateway unless you really need to.
Step 2: Add the Exchange Online email system
The first step in configuring the Email Gateway is to add Microsoft Exchange Online as a service in the Email Gateway Services Configuration dialog.
•Stop the Zetafax Server if it is running
•Click the Add Email... button to display the E-Mail Gateway Services Configuration dialog.

•Add Exchange Online to the Installed Drivers list, by selecting Exchange Online in the Available Drivers list then clicking the Add button.
•If your Zetafax system was configured to connect to another email system before installing the Exchange Online Connector files, then add each of these email systems now by selecting each in turn then clicking the Add button. The configuration settings are retained, so you will not need to reconfigure these additional systems.
•Click the OK button to return to the Email Gateway configuration settings screen.
Step 3: Configure the Exchange Online driver settings
The Email Gateway Properties dialog allows you to configure various settings for Exchange Online.
•Click the Configure button to display the E-Mail Gateway Properties dialog.
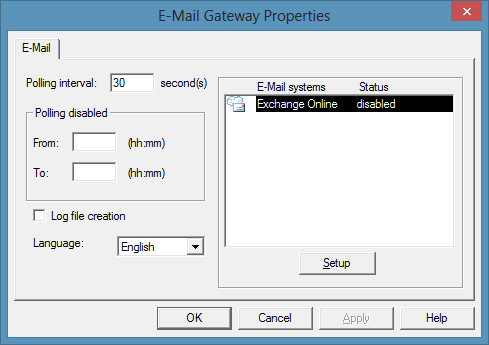
•Set the Polling interval to 30 seconds.
•For Exchange Online, the Zetafax Server polls the Exchange Online server across the Internet at the frequency specified by this setting. This interval can be reduced when configuring or testing the system, however we recommend setting it to 30 seconds or longer for use on a live system.
•Highlight Exchange Online in the Email systems column and click Setup to display the settings dialog for the Exchange Online driver.
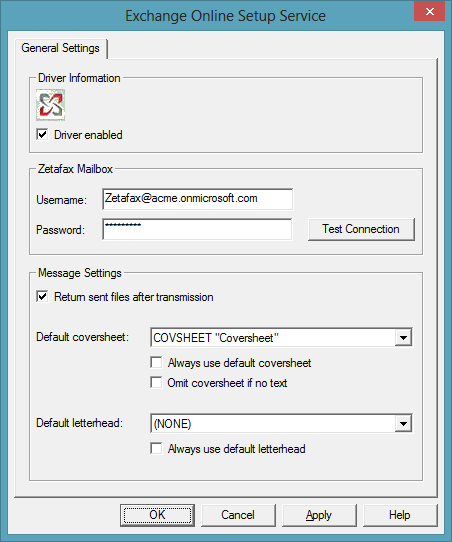
•Set the options as follows:
oDriver enabled – set to selected (enabled). This option enables or disables the Exchange Online portion of the email gateway.
oUsername – enter the email address for the Zetafax mailbox account created earlier – e.g. “Zetafax@mycompany.com” or “Zetafax@mycompany.onmicrosoft.com”.
Note that this must be the Zetafax mailbox, not the administrator account.
oPassword – enter the password for the Zetafax mailbox account created earlier.
oReturn sent files after transmission – set to selected. This option specifies whether a copy of the sent fax should be included in the email message sent back to the user when a fax completes.
oDefault coversheet – set to your company default coversheet. This coversheet will always be used if the 'Always use default coversheet' option is selected, overriding any options specified when sending faxes. The drop down list shows all coversheets configured on the Zetafax Server – it is updated automatically by the Zetafax Connector.
oAlways use default coversheet – set to not selected. Selecting this option forces all faxes sent from this account to use the default coversheet. If the option is selected then users will not be able to override the coversheet using the message commands.
oOmit coversheet if no text – set to not selected. This option is used in automated systems where fax messages including a coversheet are submitted by attaching to a mail message.
oDefault letterhead – set to (NONE)
oAlways use default letterhead – set to not selected. If this option is selected then users will not have the option to select a letterhead using the message commands.
•Next click the Test Connection button to check the username and password entered above are correct and test connectivity with the Exchange Online server.
•On a newly configured system this can take up to two minutes to run – please be patient. When the test is completed a dialog box will be displayed giving the result.
•Once the connection test has completed successfully, click OK to return to the Email Gateway Properties dialog, then click OK again to return to the Zetafax email gateway configuration options screen.
Step 4: Configure rendering options
•On the Zetafax email gateway configuration options dialog, click the Rendering... button to display the E-Mail Gateway Rendering Properties dialog.
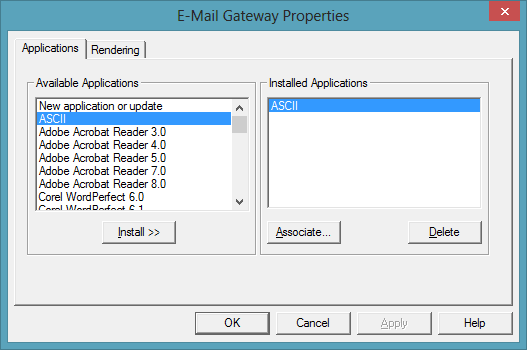
•On the Applications tab, add ASCII to the Installed Applications list by selecting ASCII in the Available Applications list then clicking Install.
•Do not add any other applications, as this is used for a legacy rendering mechanism, and attached files are now rendered directly by the Zetafax Server using a more efficient mechanism.
•Click OK to return to the Zetafax email gateway configuration options screen select OK.
Step 5: Export the list of mail users
•On the Zetafax email gateway configuration options dialog, click OK to close the dialog. You will now be asked if you wish to export the list of users.
•If the prompt to export mail users is not displayed automatically when you close the configuration options dialog, then you can start the export process manually from the main screen of the Zetafax Configuration program by selecting Users and user groups > Email gateway users, right-clicking in the main right hand pane (list of users), then choosing Refresh.
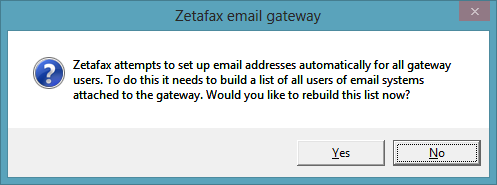
•Click Yes to display the Export Mail users dialog.
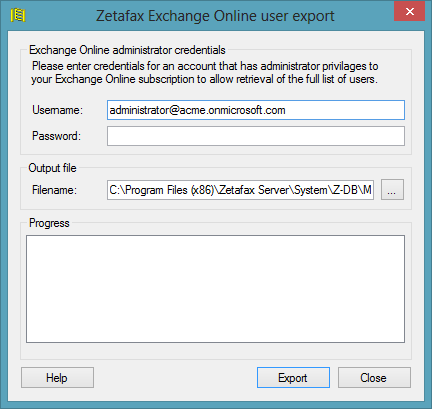
•Enter the username and password for an administrator account for the Exchange Online system. The username is the email address for the account (eg “administrator@mycompany.onmicrosoft.com”)
Note that this must be an administrator level account, in order to retrieve a list of all users. If you supply details for a standard user account, then the exported list will only contain details of that single account.
•Click the Export button to start the export. The progress window will provide details on how the export is going and how many users it has retrieved.
•Once the Export has completed, confirm that the number of users found is as you would expect, then click Close to close the dialog.