![]()
How do I sign a fax before forwarding?
Creating a signature
To create a signature file:
•Sign a piece of paper.
•Scan your signature into your computer using a scanner attached to your network.
•Ensure your signature is cropped to the correct size, and is saved as a bitmap (*.bmp).
•Save your bitmap to a location you can find it on your network.
Adding a signature to a fax for forwarding
To add a signature to a fax:
•Open your fax within the Zetafax Viewer.
•Using the annotation tool bar, select the Picture option.
•Select the location of your fax image where you would like your signature to appear, and left click your mouse.
The Open image dialog will appear.
•Browse to the location of your stored signature image.
•Double click the left button on your mouse to add your signature.
Manipulating your signature
If your signature is not in the correct location, is the incorrect size or transparency, you can correct this using the Picture Properties dialog.
To change the location:
•Use your mouse to select the signature image.
•Drag the image to the desired location.
To change the size or transparency of signature:
•Use your mouse to select the signature image.
•Using the Right click menu select Properties.
The Picture Properties dialog is displayed:
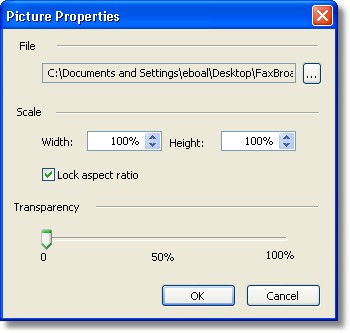
•To change the file that is being loaded us the Browse (...) button in the File section.
•To change the size of you image use the Width and Height scroll bars (if lock aspect ratio is checked, these will both change proportionally when you modify either one).
•To change the transparency of your signature use the Transparency bar.
Forwarding your fax
•Save your fax using the Save option.
•Select which method you would like use to forward your fax from the Forward menu.
•Select the pages you want to send.
•Add your recipient information and send your fax as usual.